
Busting the budget is everyone's most significant fear when renovating. Even when following essential advice—building a 20% cushion to cover unexpected expenses, checking contractor references, and avoiding impulse changes—it's challenging not to spend more than anticipated.
But why compromise on your dream project? Instead, realize your vision at a price you can manage. Not by cutting quality, but through thoughtful decisions about design, materials, and timing. Here, we'll present various strategies, ranging from major overhauls to small tweaks. Remember, every little bit counts.
- Increase efficiency, not size.
Rethink your space to optimize its utility. Instead of expanding, replace space-hogging shelves with cabinet-height pullout drawers. Such upgrades might cost upfront, but they'll save more than expanding the area. - Bring in natural light without adding windows.
Before making structural changes, explore cost-effective solutions like "light tubes" that funnel sunshine into spaces without direct sunlight. - Hit the recycling center.
Recycled or lightly used fixtures can lead to significant savings. Habitat for Humanity operates numerous ReStores offering discounted materials. Note: some contractors might hesitate to use salvaged items. - Donate your trash.
Before remodeling, let your local Habitat for Humanity chapter salvage materials. It's a win-win: you support charity, get a tax break, and reduce waste. - Do your own demo.
Handling demolition can cut costs. However, exercise caution. One wrong move can lead to expensive mistakes. - Consider long-term costs, not just short-term gains.
Investing in quality materials like preprimed siding can reduce future maintenance expenses. - Tap your contractor's sources.
Ask your subcontractor about leftover materials. Sometimes, they can source significant discounts. - Limit recessed light fixtures.
Recessed lights might seem economical, but they come with hidden installation costs. Alternatives can offer more light for fewer expenses. - Consult an architect.
An architect's insight can be invaluable, even without a full commission. One-time consultations can offer innovative solutions at a fraction of the cost.
- Partner with a contractor.
Some contractors provide consulting for DIY enthusiasts, guiding them through complex tasks. - Make sweat equity count.
If you have the time and skill, your labor can translate to savings, whether in demolition or finish work. - Do your own hauling.
Transporting materials yourself can eliminate delivery fees. Consider buying or renting a utility trailer for substantial hauls. - Don't overspend on wall prep.
If your walls need significant work, explore alternatives like Texturglas. It's a durable, paint-friendly material that can cover imperfections. - Consider look-alikes.
Opt for sustainable alternatives like Weyerhaeuser's Lyptus, which resembles mahogany but is sourced responsibly. - Demolish the whole house and start from scratch.
In some cases, new construction might be as economical as a remodel, offering added value while retaining character. - Wait until contractors want your business.
Avoid renovating during peak seasons. Contractors often offer discounts in slower months. - Skip the foundation.
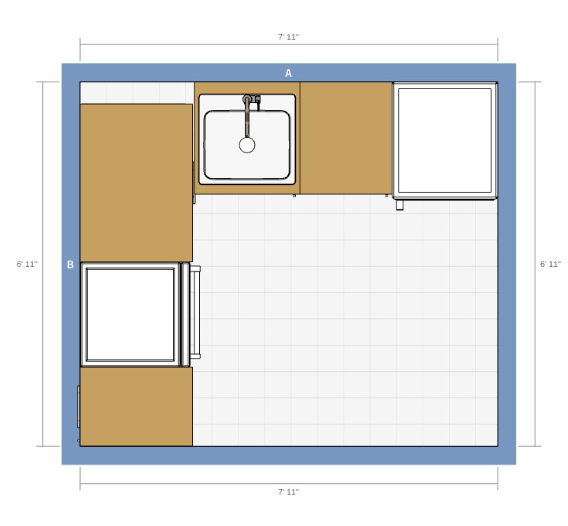
For small additions, see if local codes allow support via posts and beams, similar to a deck. - Don't move the kitchen sink.
Relocating plumbing can be costly. Keep fixtures where they are if possible. - Plan with stock sizes in mind.
Design around standard material dimensions. Off-the-shelf sizes are more economical than custom orders. - Make decisions early.
Start shopping and planning before construction begins. Being decisive prevents reliance on potentially low contractor allowances.
Pre-Construction Tools and Materials List
Tools:
Computer or Tablet:
- For research, creating design drafts, checking local regulations, communicating with professionals, and sourcing materials.
Software:
- CAD Software: Allows for design and drafting of your renovation plans.
- Budgeting Software or Spreadsheet: To track expected costs and compare against actuals as quotes come in.
- Project Management Tool: Helps schedule tasks, set reminders for milestones, and track progress.
Printer & Scanner:
- For printing designs, local regulations, contracts, and scanning any handwritten notes or documents.
Measuring Tape:
- Critical for taking accurate measurements of the space to ensure your plans are feasible.
Notebook & Pen:
- For jotting down ideas, sketches, and notes during the planning phase.
Camera or Smartphone:
- To take pictures of the current space, which can be useful for designers, contractors, or for before-and-after comparisons.
Local Code & Regulation Books:
- To ensure the planned remodel complies with local building codes and regulations.
Materials:
Blueprint Paper or Graph Paper:
- For sketching out ideas or preliminary designs.
Folders & Binders:
- Organize printed materials, contracts, receipts, and other important documentation.
Local Zoning Maps & Restrictions:
- These can often be sourced from a local town hall or online database.
Reference Books & Magazines:
- For design inspiration and technical advice.
Sample Materials:
- Paint swatches, wood samples, fabric swatches, etc., to visualize and decide on materials and colors.
Sticky Notes & Highlighters:
- Useful for marking important sections in code books, making temporary notes on blueprints, or highlighting budget items.
With this list, you'll be well-equipped for the pre-construction phase of your remodeling project!