
Hardwood floors give an elegant look to your house. However, over the years, the floor can lose its luster due to reasons like stains, scratches, etc. Usually, you would have to sand down the floor to raw wood, and then refinish the floor to regain the previous glow. But, it is not always necessary to sand down the floor. You can add a new coat of Polyurethane over the old finish, and your floor can be renewed to its old shine.
The reason why polyurethane works is that all wooden floors are protected by a coating, and it is the coating that eventually gets the scratches and stains. Now, if the damage is not deep, and the scratches are not too severe, you can just scuff-sand your floor using a buffer, and apply a fresh coat of polyurethane over it to finish.
Some of the advantages of using Polyurethane compared to sanding down the floor to bare wood are:
- It takes less time, effort, and cost.
- The process creates less dust and the floor can be recoated many times.
- Every time you sand down the floor to bare wood, you will remove some wood, and in case of laminated floors, there is a good chance that the plywood will be exposed after two or three times.
- You can do the recoating all by yourself if you allow at least one full day for this work.
Below is a step by step procedure of recoating your floor using polyurethane.
Tools and Materials
Assemble all the tools and materials needed for re-coating. For this process, you will find all the tools and materials at your typical home-centers like Home Depot etc. The full list is at the end of this article and you can save the list to your project folder by selecting the "Save to Project" button. We also have an app if you need to view the list while you are at the store.
Clean the Room and Floor
Remove all the items in the room including the furniture, wall-pictures, drapes etc., and cover the permanent fixtures. Turn off the air conditioning, and cover all the vents to prevent the dust from circulating in the room. Scrape out any gunk on the floor, and clean the floor using a gentle cleaner liquid of your choice. Spray the cleaner on the floor and wipe with a mop or a towel. Allow the floor to dry before starting the work.
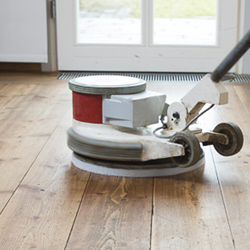
Buffing
If your floor is in good shape (e.g. you coated it previously and/or you don't need to sand out any scratches) you may be able to coat the floor without buffing. We have coated some floors skipping this step and they looked great. In fact, the photos in this article are from a floor that has not been sanded or buffed. If you do need to buff the floor, hand-sand the perimeter of the floor using 180-grit sandpaper. Swing the buffer left and right gently, starting from one side of the room and moving backwards. Make sure you put the dust mask on before you start buffing.
Vacuum and Dry-tack
After buffing, leave the room for 10 to 15 minutes. Vacuum the floor, and wipe it with a clean cloth dampened with mineral spirits. Make sure to keep the room dust-free by using a microfiber dry-tack cloth.
Apply the Finish
The last step is to apply the polyurethane. There are two types of polyurethanes, oil-based polyurethane and water-based polyurethane.
The durability of the products is not supposed to differ but I found that the water-based poly lasted longer (about one year longer). This is not scientific but based on my experience using both. The other advantages of a water-based poly is that you can apply additional coats (necessary with both) in the same day (need to wait 2 hours between coats) and the fumes are not as strong. Overall, I have found the water-based poly much easier to work with, easier to apply and lasts longer.
However, if you have used an oil-based stain before and/or you want a stain that soaks into the wood grain (may darken the wood) then the oil-based stain might be a better choice.

Apply the finish by cutting-in along the edges of the wall using a high-quality bristle brush. Stop after ten minutes since the finish may start to dry. Then, use a paint pad or roller to spread out the polyurethane across the floor. Brush more along the edge, and repeat the above steps until all the floor is covered.
Apply 2-4 coats.
After re-coating, keep the floor untouched for about 12 to 18 hours. After that, the floor can withstand light foot traffic. Avoid heavy foot traffic and moving furniture for at least 72 hours. Vacuum the floor frequently to remove dust. Don't use wax or oil soaps on polyurethane floor.